Event management
A model railway layout is a miniature world, but it only comes to life when trains run through the landscape, shunt at the station, switch signals and points, or when cars wait at closed barriers for the train to pass. Although these processes can be controlled by the user, there is often a wish to automate these actions. This is where integrated event management comes into play, a feature allowing the automation of the whole layout.
Basics
Every change on the layout triggers an event: a train enters a section of track, a turnout switches, a switch is operated, etc. You can react to these and other events with an action, for example, stop a locomotive or close a barrier. By combining events and the actions which should follow, you can automate your entire layout.
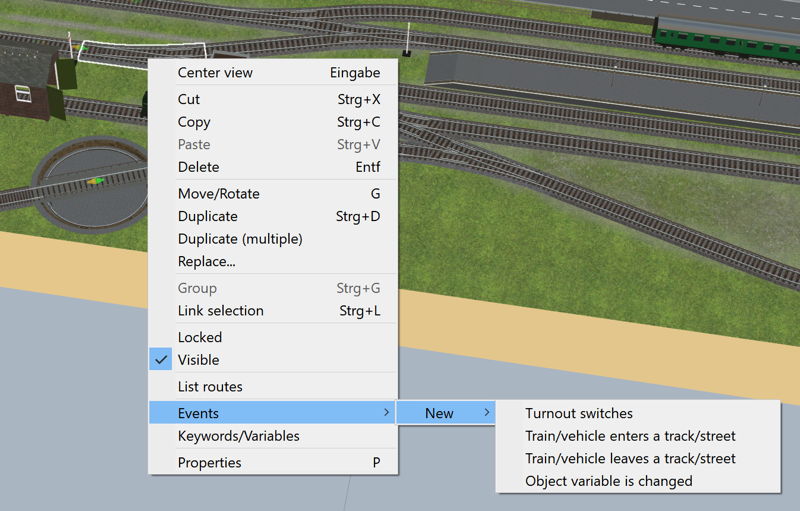
To react to an event, you must first specify the event:
- Right-click an object (e.g. a point) whose event you want to react to.
- In the Events menu item, a list of all events that are triggered by the selected object appears under New.
- Select an event to create a new entry in event management.
Alternatively, you can access event management by clicking the Event control icon ![]() in the toolbar.
in the toolbar.
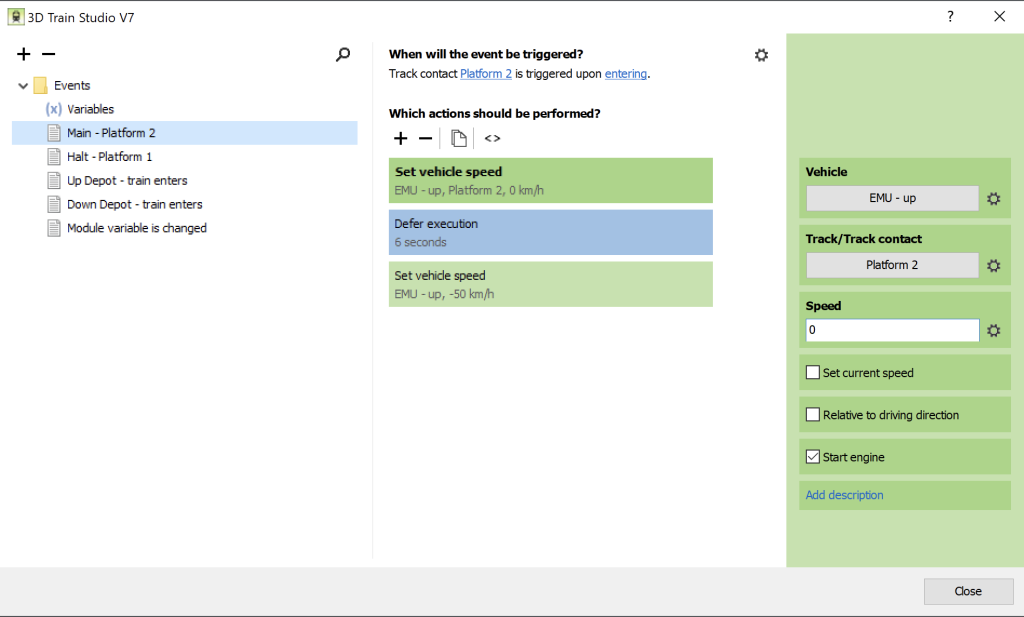
After creating an event you get to the event management screen. This window lists all events defined on the layout in the left-hand area. You can rename these for a better structure and sort them into their own sub-folders (event modules).
The properties and actions of the currently selected event are displayed in the middle area. An event can be triggered in different situations, for example, for a certain track, for any track or for all tracks with a certain keyword (see below).
If the event is triggered, 3D Train Studio carries out all actions in sequence that were specified in the middle area. You can add any number of actions to an event and move them easily using drag & drop.
If you select an action, a list of all properties that specify the action more precisely appears in the right-hand area.
Conditions
Actions are often only allowed to be carried out under certain conditions. A passenger train, for example, should come to a stop in a train station, whereas a freight train should pass through. All actions in event management can optionally be limited by nested conditions:
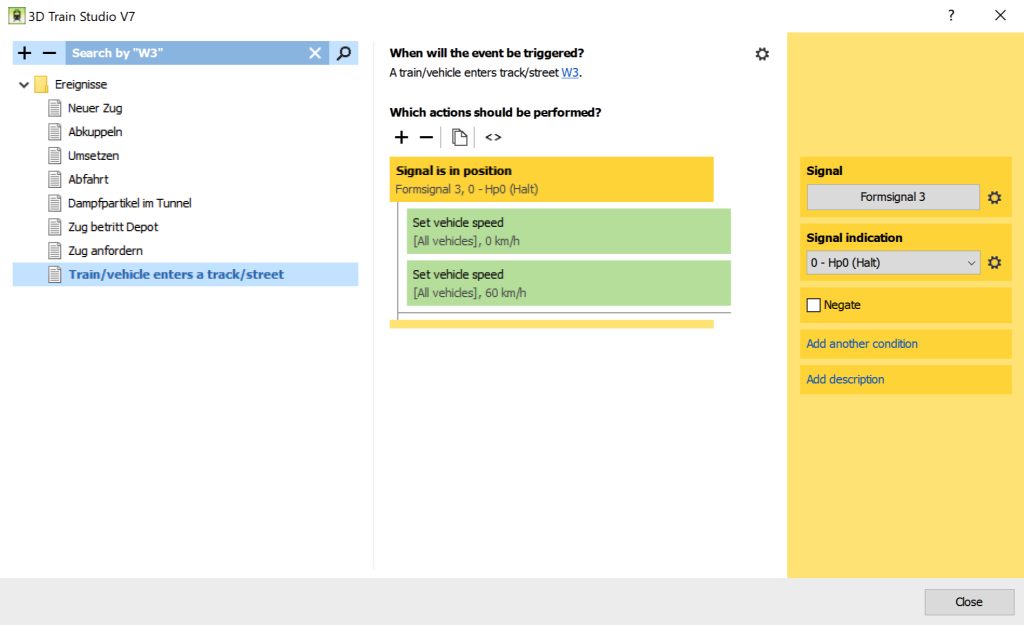
Each condition has two paths:
- If the condition is met, the actions are carried out above the black dividing line.
- If the condition is not met, the actions below the black dividing line are carried out
Each path can in turn contain its own conditions with subordinate actions. The properties of a condition are configured like the actions in the right-hand area. In addition, a condition can consist of partial conditions that are logically linked to one another:
- Click on Add another condition and select from a list of all partial conditions
- As a link, select either AND (all partial conditions must be met) or OR (at least one partial condition must be met).
- Add a group to nest conditions. Each group can have a different link.
Value types
Every action and condition has different properties that can be set. For example, the action “Set vehicle speed” requires specifications of the vehicle and of the speed. This information can be predefined, but it can also be “parameterised”, ie the value of the property can be determined dynamically by the program. The source of a property is set by clicking the gear icon next to the property and choosing from the pop-up menu.
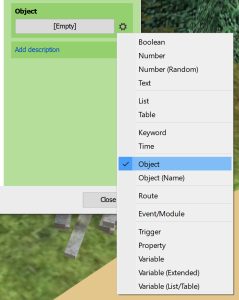
Not every source is available for every property. If, for example, a vehicle is to be specified in an action, a property of the type number or text does not make sense. Only sources supported by the current property are shown. Possible property sources are:
- Boolean – The property is either TRUE or FALSE.
- Number – The property (e.g. a speed specification) results from a number (whole or real number).
- Number (random) – The property results from a number that is determined randomly in the specified range.
- Text – The property results from a character string. Numbers are also interpreted as text in this case.
- Keyword – The property is a keyword, see below.
- Time – The property contains a time specification in the form hh: mm (hours: minutes)
- Object – The property contains a reference to an object on the system
- Object (Name) – The property contains a reference to an object on the system that has a specific name. This option should only be selected for objects whose names are unique, as the result is otherwise undefined.
- Event / Module – The property contains a reference to an event or an event module.
- Trigger – The property contains a value that is related to the triggering of the current event, see below.
- Property – The property contains a value contained in another property of an object.
- Variable – The property contains a value from a variable, see below.
- Variable (Advanced) – The property contains a value from a variable, the location of which can be specified dynamically.
Trigger
In many actions and conditions, triggers can be specified as a property. A trigger is a value that is directly related to the event. If a vehicle enters a track, for example, then the vehicle and the track trigger the event.
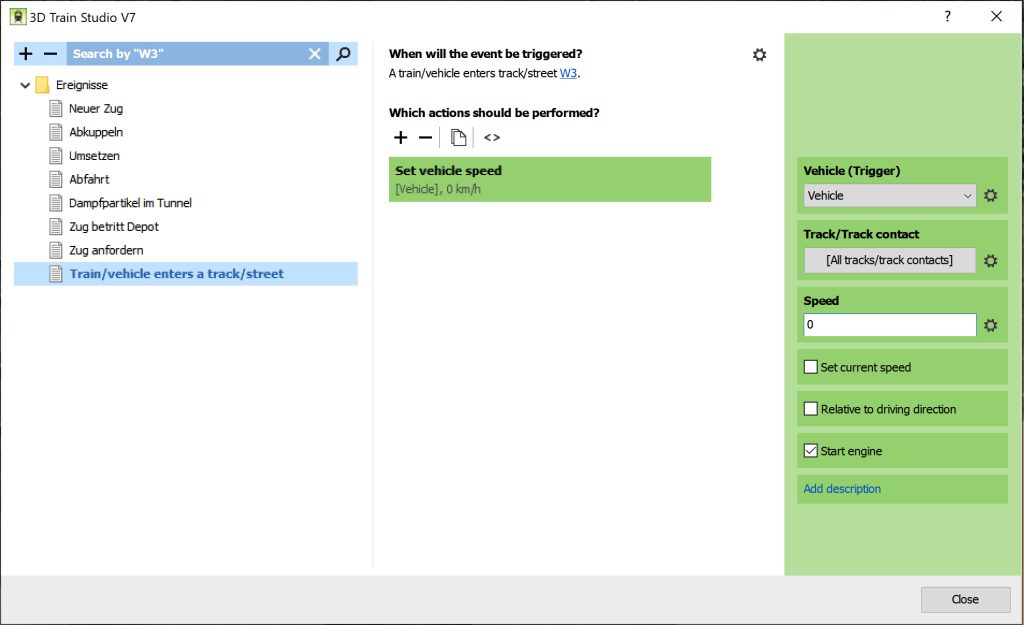
Triggers are a powerful tool for controlling different objects with one action. In the example shown above, the “Set vehicle speed” action references the triggering vehicle. The result is that any vehicle that enters the track is brought to a stop.
Timer
On many model railway layouts, recurring actions should be carried out at regular intervals, such as updating a station clock. Timers that are created in the event management using the + symbol are suitable for such recurring actions.
Each event module has any number of its own timers. If a timer expires, it triggers an event and carries out the specified actions.
Delays
In addition to the timers, delays enable even finer timing control. If a train is to be brought to a standstill for a short time in a station in order to then continue its journey, it is sufficient to specify the action Delay execution.
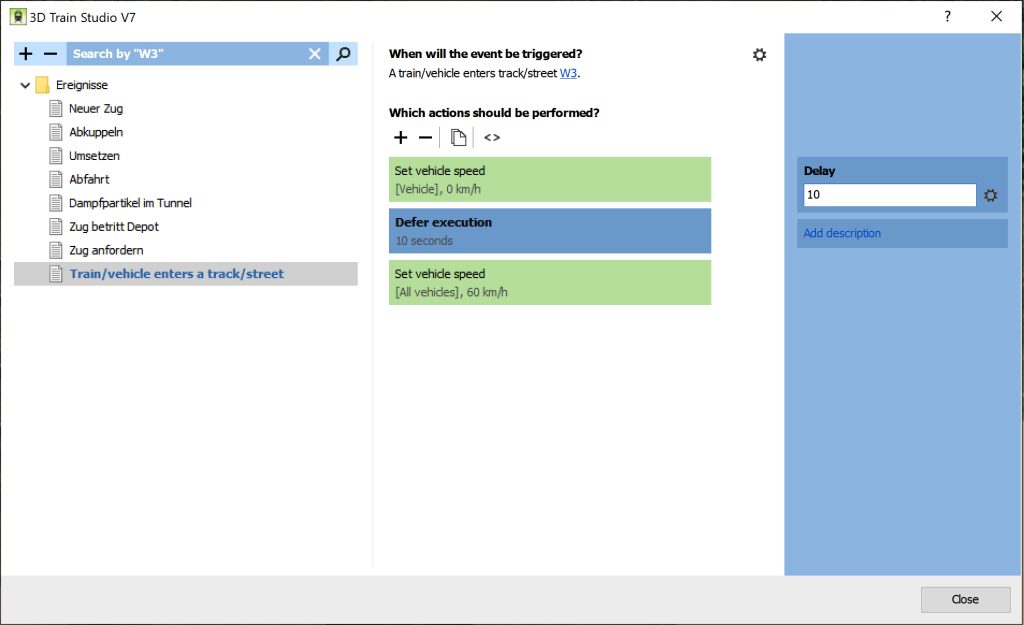
In the example shown, a train is stopped and only restarted after 10 seconds. Each event supports any number of “delay execution” actions so that an event can be interrupted multiple times.
In contrast to stand-alone timers, delays reduce the number of events required and are the first choice when it comes to one-off waiting times. In addition, deferred execution supports multiple “instances”. This means that an event can also be triggered a second time, even if the previous event has not yet been fully completed due to a delay.
Keywords
Different trains should behave differently in certain situations. For example, a passenger train should stop at a station to allow passengers on and off, but a freight train would go through without stopping. Keywords make it possible to classify trains by assigning a keyword property to locomotives and other objects.
- Right-click an object and select the Keywords / Variables option in the context menu .
- Click the + symbol and add keywords.
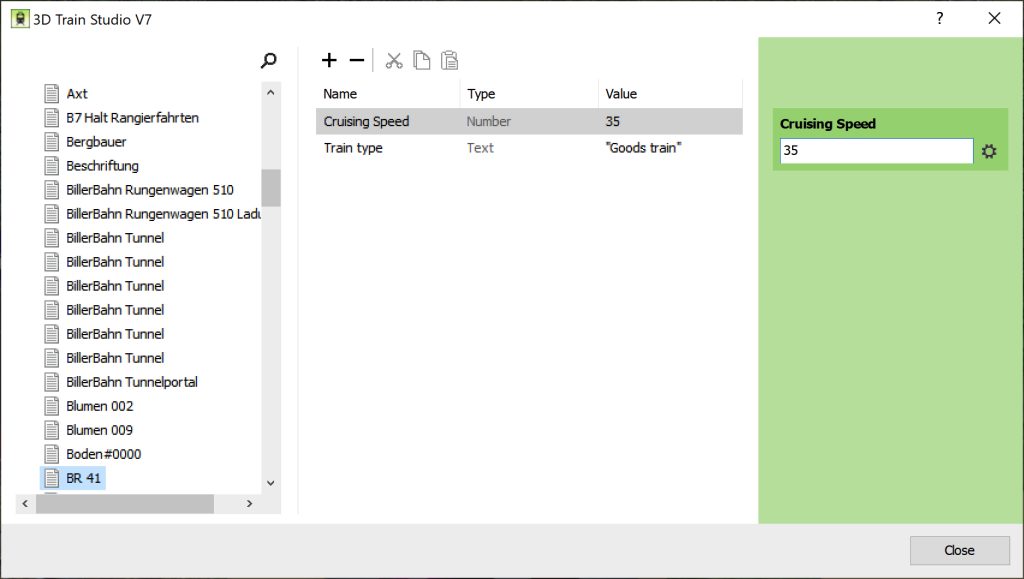
You can assign any keywords to any object on the layout. Use the copy and paste options to copy keywords across different objects.
The classification of objects opens up new possibilities:
- An event can trigger for all objects that have a certain keyword.
- A condition is only fulfilled if an object has a specific keyword.
In summary, keywords make it possible to simplify events, since a separate event does not have to be defined for each train, but only for each class of train.
Variables
Keywords can be assigned to objects. Variables add user-defined properties to the concept of keywords. A short train accelerates faster than a long train, whereby different actions should be avoided depending on the train length. By assigning a property to each train, it is sufficient to specify a single action to bring any trains to the target speed stored in the train.
- Right-click an object and select the Keywords / Variables button in the context menu.
- Click on the + symbol and add a variable, eg. a number for specifying a speed (in km/h).
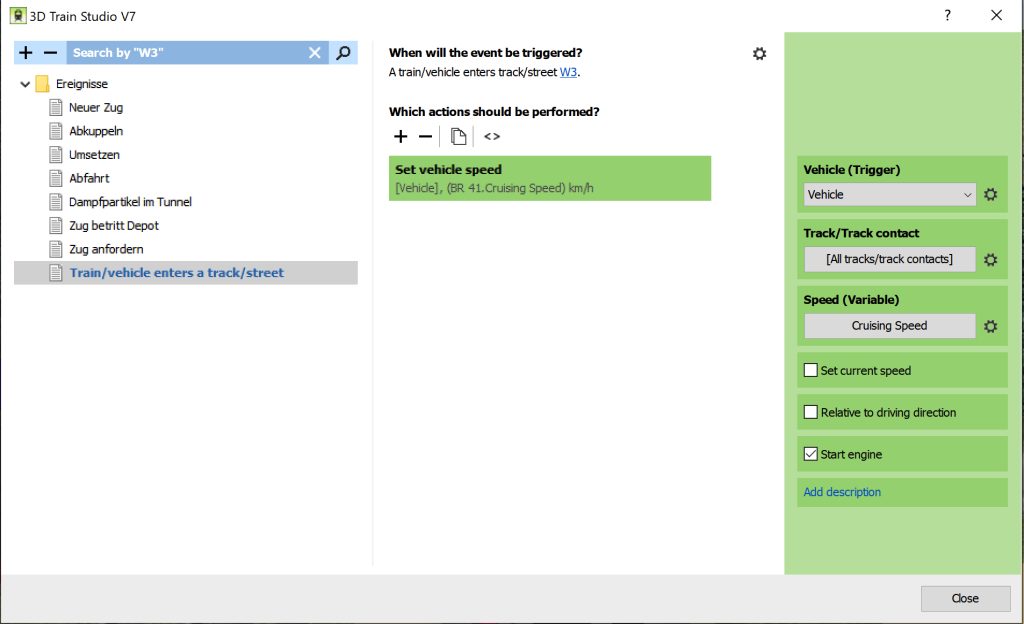
In the example shown above, each locomotive has been assigned the variable Cruising speed. If a train now enters a track contact, the train speed is set to the value that is stored in the variable cruising speed of the triggering locomotive.
Custom events
If different events are to carry out the same or similar actions, it is often tedious to define these actions several times. This can be remedied by user-defined events that can summarize actions and conditions:
- Click + > Event > Custom to create a custom event.
- Add any actions and conditions.
- Switch to another event and add the Raise Custom Event action to perform the summarized actions and conditions.
In addition, you can provide any information to the user-defined event in order to parameterize the actions and conditions contained therein:
- Activate the custom event and click Parameters to define any list of information (parameters).
- Each parameter represents a trigger that can be accessed in the actions and conditions.
- Switch back to the Raising custom event action of another event to set the content of the parameters.
Programming with Lua
While the actions and conditions cover all practice-relevant control tasks, the 3D Train Studio, with the support of the Lua script language, enables additional automation with the help of a programming language, which means that even the most complex logics can be implemented that go beyond the simple processing of actions and conditions. For more information, see the chapter Event management with Lua .
Rail contacts
Track contacts help the automatic control of a layout. A track contact is an object that can be freely positioned on a track or a road. An event is triggered when a vehicle touches the contact.
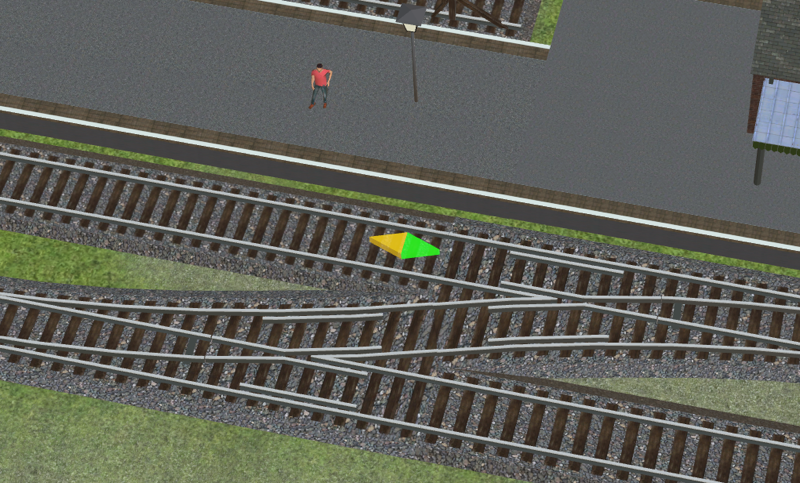
Track contacts can be found in the online catalogue in the category Keywords / Track contacts. A contact, which can also be contained in a signal or another object connected to a track, allows two directions that can be activated or deactivated separately from each other. A track contact is only triggered when a vehicle drives in the direction in which the contact is pointing.
In total, a track contact supports 3 types of contact:
- Entering – The contact is triggered when the tip of the train hits the contact.
- Entering (vehicle center) – The contact is triggered when the geometric center of a train crosses the contact. Helpful, for example, to get locomotives to stop in the middle on turntables.
- Leaving – the contact is released when a train leaves contact.
Track contacts can be connected to turnouts, signals or switches and so be assigned different properties for different states.
Debugging
The automation of complex layouts can be a laborious task. The example systems from the online catalogue, from the mini-experiments or from the tutorial systems category, are suitable for learning about the various possibilities of event management.
If the layout does not behave as planned, click the small down arrow to the right of the Event control icon ![]() on the toolbar, then select Event trace. The trace window provides information about the events and actions that have been triggered and the status of variables and timers.
on the toolbar, then select Event trace. The trace window provides information about the events and actions that have been triggered and the status of variables and timers.
