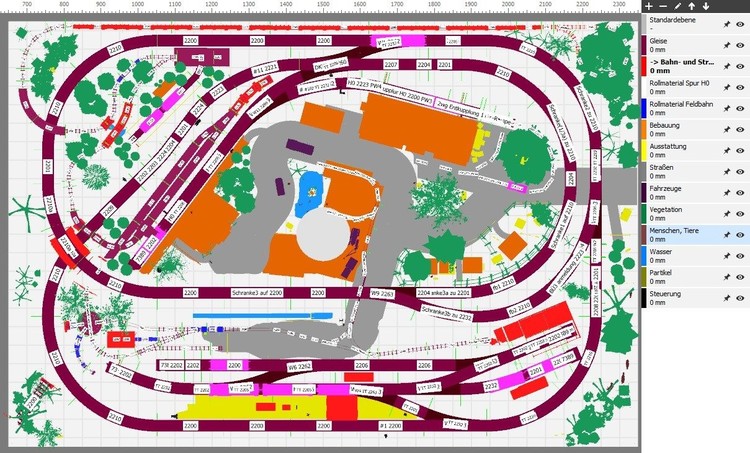
Working with layers
For extended layout planning, 3D Train Studio provides professional layer tools so layouts can be planned and constructed easily and efficiently.

A layer allows logically connected components to be hidden to allow a view of the layers below. Layers divide a layout into different sections that can be processed separately from one another. Layers are not limited to showing and hiding components, but also facilitate working at different heights and the visual separation of layout sections through individual colour settings.
Creating layers
Open a layout and activate the layer pane by clicking on the Layers icon ![]() in the toolbar. The layer pane opens at the left hand side of the screen. The layer pane allows new layers to be created and existing ones configured.
in the toolbar. The layer pane opens at the left hand side of the screen. The layer pane allows new layers to be created and existing ones configured.
Initially a layout consists of only one layer, the default layer. If there are no other layers, all new components are assigned to this layer. The default layer can be changed, but not deleted. The layer pane consists of a small toolbar and a list of all the available layers:
- In the Layer pane, + opens a dialog box for adding a new layer. The following properties can be set for each layer:

- Remove layer –: Removes the selected layer. Any components on the layer are reassigned to the default layer.
- Edit layer: Opens a dialog box for editing the selected layer. The dialog box also enables the layer to be activated. New components are added to the active layer.
- Layer up: Moves the selected layer up one position. By adjusting the layer position, you can arrange the layers according to your own ideas in order to get a better overview.
- Layer down: Moves the selected layer down one position.
- Name : Specifies the name of the new layer as it will be listed in the layer window. The name is used to differentiate between different layers.
- Colour : Defines the colour of the layer. Clicking on … opens a dialog box allowing a custom colour to be selected. The colour of the plane is used for visual differentiation in editor mode.
- Height : Specifies the height of the plane on which the assigned components are positioned. If the layer is not restricted to a height, check the No height restriction checkbox. For more information on planes with height restrictions, see the Working with planes section.
- Comment : Optional field to describe the layer. The comment is shown automatically when the mouse is briefly positioned over the layer name in the layer window.
After creating a layer, objects can be assigned to that layer. An object can only be assigned to one layer.
Working with layers
After creating layer and assigning components, layers can be used to improve layout planning:
- Pin: Click on the pin icon in the layer window to fix all the components of the layer. Fixed components can only be selected by double-clicking and are also ignored when selecting using a selection frame. Fixing a plane is useful to protect the components from being accidentally selected and moved.
- Eye: Click on the eye icon to hide the layer and all its components. Another click shows the layer again. Hiding layers reveals the objects below.
Note: Hold down the ALT key while clicking the pin or eye icon to lock / hide all other layers opposite to the current selection. This enables a layer to be made visible without hiding all other layers individually.
If you want to briefly show individual components without showing the associated layer, you can select the component and make the component visible in the properties window by clicking on the eye icon . In this case, the symbol turns red, which indicates that the visibility of the component differs from the visibility of the plane. The component retains the selected visibility until it is manually reset to the current visibility of the layer.
Double-click the name of a layer to activate it. Only one layer can be active at a time. The active layer is the layer to which new components from the catalogue are assigned. If no layer is active, new objects are assigned to the default layer.
The height of the active layer is also taken into account when placing components. There are the following rules:
- If the layer has no height restriction, new components are created at height 0. When the automatic height adjustment is activated, objects are positioned on the highest floor slab.
- If the layer has a height restriction, new components are created at the corresponding height. When automatic height adjustment is activated, objects are positioned on the table, which itself lies above the active layer and also below the next higher layer. This allows components to be positioned on floor slabs below other floor slabs.
